Resources:
http://everydayroots.com/diy-lip-balm
http://www.instructables.com/id/Easy-homemade-coconut-and-beeswax-lip-balm/
http://www.brit.co/homemade-lip-balm-recipes/
Materials:
Proccess:
Safety Hazard:
Clean Up:
Put away all materials, and to clean anything with wax on it, put a little bit of warm water to take the wax off the sides of the bowl. Then wipe clean with paper towel and dispose of it in the trash can.
Documentation:
We will take pictures throughout the whole process.
Looking Back:
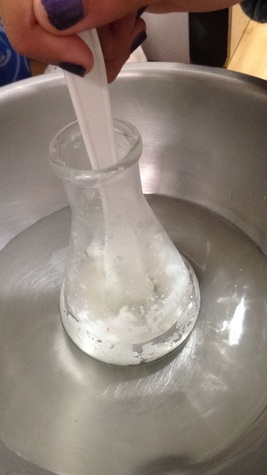
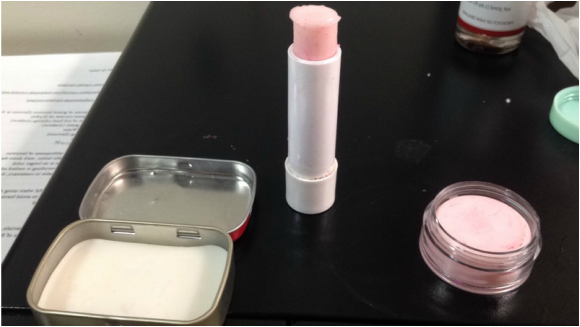
In class we were able to make lip balm/chapstick. The experiment didn't turn out the way I was expecting it to turn out. We were faced with many problems, but in the end we were able to overcome them. We had to make the lip balm two times. The first time we made lip balm the project failed, and things didn't turn out the way we planned. We were supposed to make the lip balm on the hot plate, but the hot plate was being used so we had to use the microwave. The second time we made lip balm, the project turned out a lot better, because we put in more coconut oil than beeswax.
Looking Beyond:
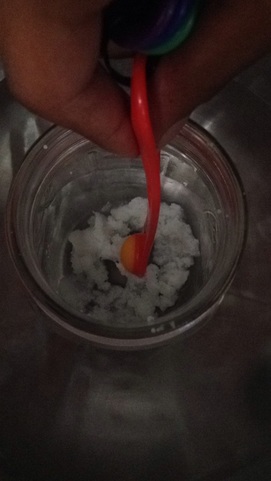
The first time we made lip balm the results were really bad. The lip balm was really hard, and it was even moisturizing. My partner and I were really confused, because we followed all of the directions, but the results were not what we were promised. We were wondering, Why isn't the wax melting? The wax supposed to melt pretty fast, but ours was taking 15-20 minutes to melt. We did some more research and we found out that the wax that we were using had a low melting point, meaning that the wax would take more time to melt. We also learned that the wax to coconut oil ratio was 1:4. So the second time we tried the experiment, we used a lot more coconut oil, and we were really patient when we were melting the wax.
Looking Inward:
The first time we did the experiment, the results were not desirable, because the lip balm was really hard, and it was so hard to use. The second time we got desirable results, because we were able to reflect on what did wrong last time, and then to improve this time. I think I did really good while doing this project, because we were able to overcome the challenges like not having a hot plate to perform the experiment. And I was able to contribute to the project by bringing supplies. Overall the project turned out pretty good.
Looking Outward:
While doing the lip balm experiment I worked with my classmate and friend Lydia. I think that Lydia and I worked really well together. We were both on the same team last year, so were able to relate because we had a similar system last year. We worked well because we were both able to contribute to the project, because we both evenly split the work load, and we also were able to contribute by bringing/buying the supplies for the project. I was able to bring certain ingredients like flavoring, which were not provided in the classroom.
Looking Forward:
If I were able to do this project again, I would probably do more research and get better wax, and I would use more coconut oil. If I were to do this project again, I would probably work with the same person, Lydia. I think we both get each other, and we work really good together, and we were both able to contribute to the workload and project.
Take Aways:
Not many skills were required while doing this project. I would advice to get a low-melting wax, and I would suggest to use a to plate. Overall this was a great start to the beginning of the year, and we were able to learn a lot about phase changes.
http://everydayroots.com/diy-lip-balm
http://www.instructables.com/id/Easy-homemade-coconut-and-beeswax-lip-balm/
http://www.brit.co/homemade-lip-balm-recipes/
Materials:
- 2 tablespoons of grated beeswax (Savreen)
- 1 tablespoon coconut oil (Lydia)
- 1-2 drops of red food coloring (Andrew)
- Cheese grater (optional)
- Boiling Water
- Fragrance Oil(Savreen)
- 2 Bowls (Savreen)
Proccess:
- Grate 2 tablespoons of beeswax
- In a double boiler, melt down the beeswax, adding in the coconut oil when about half of the beeswax is no longer solid
- When everything is melted add flavoring
- Put lip balm in containers, then let sit to harden.
Safety Hazard:
- Be careful when using double boiler, avoid skin contact because you may get burned
- In order to avoid burns wear gloves, goggles, and lab coat so nothing splashes in eye, and no skin is burned
Clean Up:
Put away all materials, and to clean anything with wax on it, put a little bit of warm water to take the wax off the sides of the bowl. Then wipe clean with paper towel and dispose of it in the trash can.
Documentation:
We will take pictures throughout the whole process.
Looking Back:
In class we were able to make lip balm/chapstick. The experiment didn't turn out the way I was expecting it to turn out. We were faced with many problems, but in the end we were able to overcome them. We had to make the lip balm two times. The first time we made lip balm the project failed, and things didn't turn out the way we planned. We were supposed to make the lip balm on the hot plate, but the hot plate was being used so we had to use the microwave. The second time we made lip balm, the project turned out a lot better, because we put in more coconut oil than beeswax.
Looking Beyond:
The first time we made lip balm the results were really bad. The lip balm was really hard, and it was even moisturizing. My partner and I were really confused, because we followed all of the directions, but the results were not what we were promised. We were wondering, Why isn't the wax melting? The wax supposed to melt pretty fast, but ours was taking 15-20 minutes to melt. We did some more research and we found out that the wax that we were using had a low melting point, meaning that the wax would take more time to melt. We also learned that the wax to coconut oil ratio was 1:4. So the second time we tried the experiment, we used a lot more coconut oil, and we were really patient when we were melting the wax.
Looking Inward:
The first time we did the experiment, the results were not desirable, because the lip balm was really hard, and it was so hard to use. The second time we got desirable results, because we were able to reflect on what did wrong last time, and then to improve this time. I think I did really good while doing this project, because we were able to overcome the challenges like not having a hot plate to perform the experiment. And I was able to contribute to the project by bringing supplies. Overall the project turned out pretty good.
Looking Outward:
While doing the lip balm experiment I worked with my classmate and friend Lydia. I think that Lydia and I worked really well together. We were both on the same team last year, so were able to relate because we had a similar system last year. We worked well because we were both able to contribute to the project, because we both evenly split the work load, and we also were able to contribute by bringing/buying the supplies for the project. I was able to bring certain ingredients like flavoring, which were not provided in the classroom.
Looking Forward:
If I were able to do this project again, I would probably do more research and get better wax, and I would use more coconut oil. If I were to do this project again, I would probably work with the same person, Lydia. I think we both get each other, and we work really good together, and we were both able to contribute to the workload and project.
Take Aways:
Not many skills were required while doing this project. I would advice to get a low-melting wax, and I would suggest to use a to plate. Overall this was a great start to the beginning of the year, and we were able to learn a lot about phase changes.
 |  |
 RSS Feed
